Showing posts with label blog. Show all posts

Wednesday, 15 June 2016

Sally Hansen complete salon manicure review

I spotted a newly large stand of Sally Hansen nail polishes in Boots recently and was taken in by the gorgeous range of colours. I decided to get a freebie with my advantage card points and give one a try. I went for the barbie-esq pink "Aflorable" in the complete salon manicure range.

The range sounds amazing, with the Sally Hansen website boasting the following 7 benefits in one bottle:

"Featuring a base coat, growth treatment, runway-inspired color, top coat, gel-shine finish, chip-resistance, and a strengthener with keratin complex for up to 64% stronger nails, this all-in-one formula delivers up to 10 days of chip-resistant wear. It’s everything you need to achieve a professional nail look at home!"

Sally Hansen complete salon manicure


When I first applied it I was a bit dubious about what kind of results I would get. Although the brush was a great size and shape the polish didn't seem to apply very evenly. However, it seemed to even out when drying and by the time the third coat was dry they were shiny and opaque. (Two coats didn't quite leave this colour looking opaque.)
Now 5 days along the line, they are pretty much chip free apart from my fore finger and thumb on my dominant hand. Staying chip free for this long is pretty much unheard of for me, so I am really impressed. I've even done my toes to match (although it has rained non-stop since, so I haven't been able to wear sandals and show them off).

I can see more colours from this range finding their way into my collection soon. What colours would you recommend?


Saturday, 23 April 2016

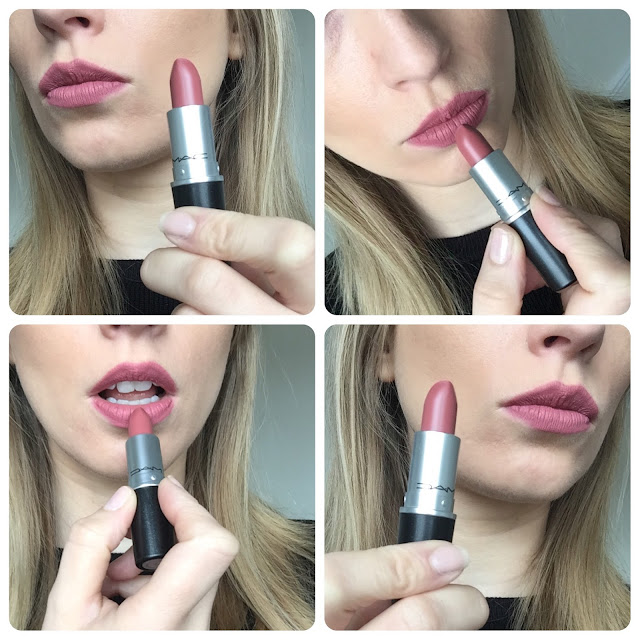
MAC Velvet Teddy

So now I feel like I am well and truly on the MAC lipstick bandwagon since adding the current bestseller Velvet Teddy to my stash only a week after trying my first (Mehr). Since the World discovered that it was supposedly Kylie Jenner's fav, MAC counters across the globe have been regularly selling out of this beauty.


I can see why it is so popular; as a matte deep nude pinky beige it is the perfect lipstick for day or night. It is not too bold to wear to work, yet strong enough to glam up your out-out makeup for the evening.


I have a feeling that my MAC lippy collection has only just begun...


Saturday, 16 April 2016

MAC Mehr lipstick

I've just jumped on the MAC lipstick bandwagon and I have a feeling that my collection is going to grow.

I've had a wish list for a while with lots of different shades that I add to after watching YouTube videos or reading blogs. I always browse eBay for a good deal and I managed to get my hands on Mehr last week for only a tenner. You may turn your nose up at me buying MAC from eBay with all the potential fakes out there, but I did my research. First off, I messaged the buyer to confirm the authenticity and they assured me it was. A lot of the fake sellers will ignore these messages as they will be in huge trouble with eBay if they do indeed be found out to sell fakes after denying it. Or they will word their response carefully so it does not confirm authenticity. I felt this buyer was being honest. Secondly I read numerous articles about how to tell a fake and when I received the lipstick it matched up with what to look out for with the 'real'. 

MAC Mehr


When I first tried on Mehr, initially I didn't think I'd like it, I thought it was a bit too red. I headed back to the Internet in search of photos and inspiration to try and make it work for me. In some pictures it reminded me of my Rimmel lip liner in Eastend snob, so I thought I'd give it a go with the liner. The result was a new found love! 

MAC Mehr


I've been wearing the combo the last couple of days; to work and just out and about and it's a really wearable colour.

I am definitely a fan.

What colour should I get next?


Monday, 4 April 2016

OPI Nail Envy review

I recently bought the OPI Nail Envy in Hawaiian Orchid after seeing a picture of it on Instagram and falling in love with the colour. At the time, the fact that it was a nail strengthener never really entered my mind. I'd tried various nail strengthening potions in the past and never found they'd made a shred of difference. It was purely all about the colour.

OPI Nail envy
OPI Nail Envy Hawaiian Orchid

I applied Hawaiian Orchid practically as soon as it landed on my door step. I'd never tried OPI before, so it immediately struck me how great the formula is and how much I love the shape and size of the pot - its really easy to hold and apply. Although it seemed thinner than a regular nail varnish when on, it was opaque after two coats and the colour was as I'd hoped for; a beautiful dusty pink.

I headed back to the Internet to see what other colours they did in the range and came across Bubble Bath. The pictures I saw of it, made it look like a lovely opaque pale pink, my thinking was perfect for spring.

OPI Nail Envy
Top: Hawaiian Orchid, Bottom: Bubble Bath

When Bubble Bath arrived, I did think it didn't look as pink as I'd imagined it would from the pictures, it is more of a nudey pink. I was slightly disappointed when applying it to realise it was not going to be opaque after all like I'd hoped for. The photos above are with three coats of Bubble Bath and you can still see my natural nail underneath.

However, after my initial disappointment with the colour it struck me a few days later how healthy my nails were looking. Throughout my teenage years and my twenties I'd struggled with nail biting and had weak nails that peeled and would easily break probably as a result of that. I haven't been so bad the past couple of years, but my nails always still seemed weak and would break easily. But all of a sudden I have noticed that I have some length to all of my nails and no breakages. I can only attribute it to Nail Envy, a miracle worker in a small bottle.

If you have problems with weak, breakable nails I would definitely recommend you try this. I now intend to buy the original Nail Envy to use as a base coat under all of my other nail polishes.


Sunday, 14 February 2016

LA Splash liquid lipsticks review

LA Splash is an American brand I discovered through watching one of Hollie Wakehan's makeup YouTube videos. I now love them! Luckily you can buy them in the UK. 

They are the first liquid lippys I've tried and they are great. Both the colours I picked are gorgeous and they last for hours. I think they'd look great on any skin tone. They are also cruelty free and suitable for vegans. I have heard people compare them to Lime Crime, which I believe is quite the complement. 

The first is Nymphaea (AKA nymphodora). It is a pinky/red/mauve perfect for autumn/winter and it makes my teeth look so white. Also great for glamming up your makeup when going out in the evening.

The second shade is "Charmed" which is quite a cool toned nude. It's great for every day wear and with its staying power I still have it on at the end of my working day.

The daupher applicators make them easy to apply. You use the pointed part on the end to line the lips then the flat part to fill. I say pointed part, but it's a daupher, so not really THAT pointed - you need a steady hand. You also need to be careful not to over-apply as, the charmed in particular can end up looking quite cakey if you aren't careful. 

But overall, I am a fan and I will be purchasing some more colours in the near future. 

Thursday, 9 July 2015

Konjac sponge review

I read about the Konjac sponge on another blog and the review was so positive I ordered one straight away.

Picture from Amazon.co.uk
This is the one I got from Amazon. They do a number of different ones, but I went for the bamboo charcoal as it is for oily and spot prone skin (me!). After rushing into the purchase and spending about £7 on it, I later took to eBay to have a browse and found them much cheaper there. Although they were unbranded, they were only about £1. Still, I told myself you can't beat branded products for skincare.

When it arrived I really did enjoy using it. It makes your skin feel really soft, much more so than your average face wash or scrub. I didn't want to cut out my face wash products all together although I think you can with these, so I tend to use this after my face wash to clean off any dead skin cells. It doesn't banish my oily skin or spots, but it does seem to help any blemishes reduce that little bit quicker and not get so severe in the first place.

I left this hanging in my shower between uses and I think that is where it went wrong. After a couple of weeks it started to crumble and once it got too bad I had to throw it away. Looking back, when it arrived and I unpackaged it, it was wet. So I probably should have put it back in the packaging after using to keep in the moisture. 

Since then, I ordered one of the cheap unbranded ones from eBay (in case the crumbling happened again). This time, I've kept it in the bag it came in, not letting it dry out and it is still going strong. Also, there is little different between the branded and unbranded, certainly not something I can justify spending £7 on, when the £1 does the same job. 

The konjac sponge is definitely an addition to my skincare routine that I will be keeping. Also the branded ones make up a nice part of a gift or stocking filler. 

Sunday, 16 November 2014

Herbalife Skin review

I first heard about Herbalife Skin via Facebook (I am FB friends with a girl who makes dresses and has recently started selling Herbalife). She claimed that she used this 7 day results kit and it changed her skin and made it look amazing. Being someone who has struggled with my skin since puberty, a claim like this made my ears prick up. 

She was selling it for £20 plus P&P, but I found another distributor via eBay (shh) who did it a couple of pounds cheaper. For what you get in the kit (3 small tubes and 4 sachets), it's bloody expensive! 

The kit contains:
Mini Soothing Aloe Cleanser 50ml 
Mini Daily Glow Moisturiser 15ml 
Mini Replenishing Night Cream 15ml 
Firming Eye Gel Packette – 2 x 2ml 
Hydrating Eye Cream Packette – 2 x 2ml


Herbalife, skin, 7 day results kit


 It arrvied a few days later and at this point I started to wonder how a cleanser and a couple of moisturisers could have any major impact on my skin. Not even a toner?!

Still, I thought I'd give it a go, after all I had spent my hard-earned cash on this. So for 7 days straight I used nothing but the kit. 

A couple of days in I had a spot breakout on my forehead. I kept going though, put it down to the possiblity of monthly hormones. The Herbalife rep actually messaged me on day 5 to ask how it was going (and if I'd like any full sized products!). I told her about the breakout, and she likened it to when you get a facial, that the products bring out all of the impurities first.

It is now day 9. The breakout on my forehead is still there - not any worse, but not any better.

Maybe if the kit came with a bit more, like a toner, or a face scrub it might be a bit more effective for spot prone skin. But for me, it's not really done much good.

I'll finish the kit, but wont be ordering any full size products.

Wednesday, 17 September 2014

Benefit Hoola Review

Now I know what all the fuss is about! This bronzer is gooood.


I bought this little gem for a discounted price the other week from Cohorted. As you can see above, they included a little freebie too in the shape of a peach Maybelline baby lips (it feels and tastes amaze by the way!).

Anyway, back to the review in hand. The first time I tried it, I made the mistake of using the brush it came with. Although it is an ideal shape to apply to the contour of your cheek, it is not the ideal density to blend. The next time, I tried it with my Real Techniques contour brush and was much more satisfied with the outcome.


Matte bronzer has not been a holy grail product for me before now. I've always gone back to my Collection Mozaic bronzer which is bronze shimmery beautifulness. However, I really like the subtleness yet effectiveness of this bronzer.

The down side is that it is very pricey for what it is. However, for me part of the price tag on Benefit makeup is having that pretty packaging sitting in your clear muji acrylic drawers, or poking out the top of your makeup bag. (Is that just me who is that snobby?!)

Definitely worth a try though if you can afford it or you can find it discounted.


Thursday, 31 July 2014

Blog revamp

Dear blog

Lately you have been neglected, I know and I'm sorry. This is partly down to work and my hectic lifestyle of late, but it is also down to the fact that "Trying 2b Beautiful" is not really fitting with me any more. Like all things in life, I think it is time for you, the blog to evolve.

I used to be driven by make up and beauty product reviews, but I don't find these exciting or interesting to write so often any more.

I forsee a growing focus on fashion, crafts, home and lifestyle type posts which fits more with me, here, now. With this will come a new look blog, and hopefully a new name and logo.

Until then...

Emma

Thursday, 7 November 2013

A spot of luck

I haven't blogged for ages! I've really wanted to, but literally haven't had the time. Work has been crazy and then I went to New York for my birthday, so it's been non-stop. Anyway, I'm here now and shall vow to be more regular in my blogging.

Today I want to tell you about some luck I had recently; I won my first ever blog giveaway! Sophie from sophiejanethorne.blogspot.co.uk ran a giveaway to win a Wet n Wild nail polish in red - and lucky old me won.

Sophie is so lovely that she actually included a couple of extra items for me to apologise because she had a slight postal delay. So not only did I get the Wet n Wild polish, but also a Maybelline one and a strawberry flavoured Lypsyl.

As I got these items a month or so ago now, I have had time to fully try them out and review them.

Wet n Wild Wild Shine nail colour
Love the colour, it is a really bright red with a hint of pink in a certian light and as it's a gel polish it looks great on. It's really shiny, especially with a top coat on. It lasted well, but not quite as well as the Maybelline.


Lypsyl Strawberry Polka-dot
Tastes great and contains SPF. It claims to be tinted, but I couldn't notice much, maybe a slight pale pink, but not really. The downside to this is that it is quite a hard textured balm, you really need to rub it on. It worked best when I had it in my pocket and then used it as the heat had softened it. 

Maybelline Super Stay 7 Days gel nail colour
This is amazing! The red was probably a shade darker than I'd normally go for as I have quite fair skin, but it looked great and lasts soooo well. In fact I put this nail varnish on for my 5 day holiday to New York and it last the whole trip. So not quite 7 days, but I don't think I had time to put a top coat on.


I will definitely buy more of these Maybelline 7 day polishes.

To finish, thank you very much Sophie for the gifts, it's so generous of you to run these giveaways. Everyone else head over to Sophie's blog for beauty reviews, recipes, fashion and more.


Wednesday, 28 August 2013

Making beautiful photo collages for your blog

I'm a follwer of The Beauty Department and oh my how lovely their photo collages always look. I wondered if there was a specific bit of software that would do this for you so did a bit of research. It soon became clear that this is just the work of some very creative people.

So I did a bit more research to try and find out what software bloggers use to help thiscreative flare. It turns out that most people us one version of Photoshop or another. I don't own Photoshop but do hower have an open source (free) image editing software called GIMP (download here). I've done many a photo edit in GIMP so thought I'd have a go at my first ever collage.

This post I came across on The Beautiful Mess helped a lot too.

Now bare in mind this was never someting I made to share so it's rather basic and I need to experiment a bit more to get my own style. But I'm quite impressed and it didn't even take very long.

What do you think?

1. Miss Selfridge £26 2. New Look £24.99 3. Next £28

The basic idea is to use good quality images, make sure they don't have a background (or remove it if they do), select a couple of decent fonts and use full stops (periods) to point towards the products.

Now I know I'm along way off from perfecting this, but it was just a trial and I wanted to share the findings of my research on this.

I'll work on it and hopefully one day my collages will be good enough to officially use in my blog.

She Said Beauty